오늘은 NestJS로 구현한 api를 사용해 프론트에서 Authentication을 구현해보려고 한다.

바로가자~!
개인적인 공부를 위해 작성하는 블로그입니다. 혹시라도 잘못되거나 부족한 부분이 있다면 댓글로 알려주시면 감사하겠습니다.
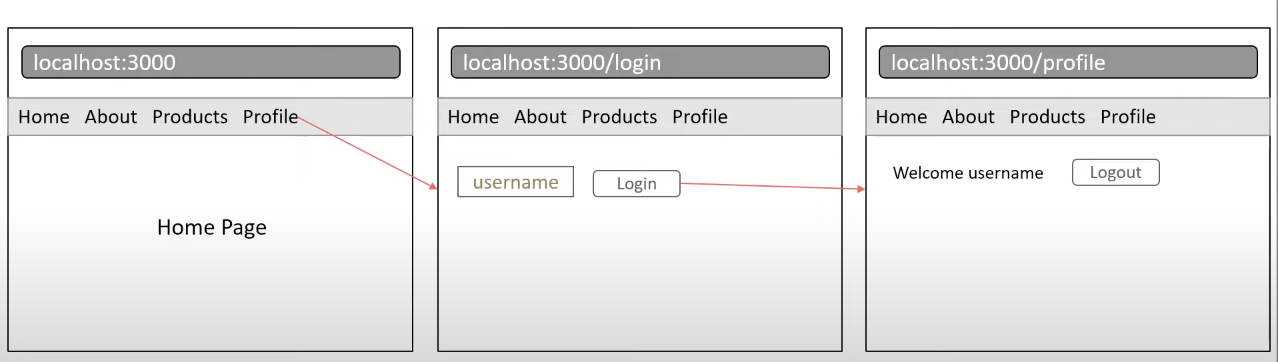
위와 같이 /login post 요청을 통해 JWT 토큰을 받아오면 /profile 라우터에 접근할 때토큰인증을 해야 한다.
우선 전역적으로 로그인 정보를 저장하기 위해 zustand와 토큰정보를 브라우저에 저장하기 위한 미들웨어인 persist도 같이 설치해 주었다.
💁🏻 Zustand
npm install zustand zustand-persist
zustand란 React 애플리케이션의 전역 상태 관리 라이브러리로 Redux와 같이 Flux구조를 사용하지만 보일러 플레이트 코드가 적어 가볍고 사용하기 쉬운 상태관리 도구이다.
persist란 Zustand의 상태를 브라우저 저장소에 유지하기 위한 미들웨어로 localStorage나 sessionStorage에 상태를 자동으로 저장/복원하여 페이지 새 로고침해도 상태가 유지되도록 한다.
그렇다면 토큰은 어디에 저장해두어야 할까? 로컬스토리지나 쿠키(http only)에 저장하게 되는데 각각의 장단점이 있어 이를 보완하여 만료 시간이 긴 refresh token(2주~1달)을 쿠키에 저장하고 새로고침시 access token(15분~1시간)을 서버에서 받아와 저장해서 사용하는 방식이 주로 사용된다. (좀 더 보안을 생각한다면 refresh token을 매번 새로 발급하는 방식도 있다.) 참고링크
빠른 완성을 위해 일단은 localStorage에 저장해서 사용해 보자. persist 마지막 인자에 이름과 저장할 위치를 지정해 주면 자동으로 처리가 되는데 스토리지에 createJSONStorage()를 통해 로컬스토리지에 저장해주어야 한다. 이것 때문에 계속 오류가 나서 고생했다.
import { create } from 'zustand'
import { createJSONStorage, persist } from 'zustand/middleware'

const useAuthStore = create(
  persist(
    (set) => ({
      token: null,
      setToken: (token) => set({ token }),
      clearToken: () => set({ token: null }),
    }),
    {
      name: 'auth-storage',
      storage: createJSONStorage(() => localStorage),
    }
  )
)

export default useAuthStore
그럼 이렇게 컨포넌트에서 자유롭게 useAuthStore()에서 가져와 사용할 수 있다.
import { Link, useNavigate } from "react-router-dom";
import { zodResolver } from '@hookform/resolvers/zod';
import { useForm } from "react-hook-form";
import { loginSchema } from '../../validationSchemas';
import { fetchLogin } from '../../api/api-auth';
import useAuthStore from '../../store/authStore'; // zustand로 상태 관리

export default function LoginPage() {
  const navigate = useNavigate();
  const { register, handleSubmit, formState: { errors } } = useForm({
    resolver: zodResolver(loginSchema),
  });

  const setToken = useAuthStore((state) => state.setToken) // zustand의 setToken 사용

  const onSubmit = async (data) => {
    try {
      const response = await fetchLogin(data)
      console.log('Login response:', response) // API 응답 확인
      setToken(response.token)
      console.log('로그인 성공!!')
      navigate('/');
    } catch (error) {
      console.error('Login error:', error); // 에러 상세 확인
      alert(error.response?.data?.message || '로그인에 실패했습니다.');
    }
  };

  return (
    <div className="flex items-center justify-center bg-gray-50">
      <div className="p-8 w-full max-w-md space-y-6">
        <h1 className="text-3xl font-bold text-gray-900 text-center">
          로그인
        </h1>
        <form onSubmit={handleSubmit(onSubmit)} className="space-y-4">
          <div>
            <label htmlFor="email" className="block text-sm font-medium text-gray-700">
              이메일
            </label>
            <input
              {...register('email')}
              type="email"
              id="email"
              name="email"
              placeholder="이메일을 입력하세요"
              className="mt-1 block w-full px-4 py-2 border border-gray-300 rounded-md shadow-sm focus:ring-blue-500 focus:border-blue-500"
            />
            <p className="text-sm ml-1 text-gray-600">{errors.email?.message}</p>
          </div>
          <div>
            <label htmlFor="password" className="block text-sm font-medium text-gray-700">
              비밀번호
            </label>
            <input
              {...register('password')}
              type="password"
              id="password"
              name="password"
              placeholder="비밀번호를 입력하세요"
              className="mt-1 block w-full px-4 py-2 border border-gray-300 rounded-md shadow-sm"
            />
            <p className="text-sm ml-1 text-gray-600">{errors.password?.message}</p>
          </div>
          <button
            type="submit"
            className="w-full py-2 px-4 bg-red-400 text-white font-bold rounded-md hover:bg-red-500 focus:outline-none focus:ring-2 focus:ring-red-400"
          >
            로그인
          </button>
        </form>
        <div className="text-sm text-gray-600 text-center">
          계정이 없으신가요? <Link to="/register" className="text-blue-500 hover:underline">회원가입</Link>
        </div>
      </div>
    </div>
  );
}
그럼 이렇게 LocalStorage에 잘 저장된 모습을 볼 수 있다.

👨🏻💻 React Router Dom Loader
React Router에서 v6.4부터 Loader와 Action과 같은 새로운 기능들이 도입되었는데 그 중 Loader를 통해 라우트가 렌더링 되기 전에 zustand를 통해 저장된 토큰정보에서 username을 가져와 사용해보자
import { redirect } from "react-router-dom";
import useAuthStore from "../../store/authStore";
import { jwtDecode } from "jwt-decode";

const getUserToken = async () => {
  const token = useAuthStore.getState().token;
  if (!token) {
    return redirect("/login");
  }
  try {
    const decoded = jwtDecode(token);
    const currentTime = Date.now() / 1000;

    if (decoded.exp < currentTime) {
      useAuthStore.getState().clearToken();
      throw redirect("/login");
    }
    return { username: decoded.username };
  } catch (error) {
    return redirect("/login");
  }
};

export async function authLoader() {
  const user = await getUserToken();
  if (!user) {
    console.log("user is null");
    return redirect("/login");
  }
  return user;
}
import { createBrowserRouter, RouterProvider } from 'react-router-dom'

// 페이지 및 레이아웃 컴포넌트 import
(생략)
import { authLoader } from './loaders/authLoader'

// 로딩 컴포넌트 생성
const LoadingFallback = () => (
  <div className="flex items-center justify-center h-screen">
    <div className="text-lg">로딩중...</div>
  </div>
);

const router = createBrowserRouter([
  {
    path: "/",
    element: <Root />,
    errorElement: <ErrorPage />,
    children: [
    (생략)
    ]
      },
      // 인증 필요한 라우터 관리
      {
        path: "account",
        element: <AuthLayout />,
        errorElement: <ErrorPage />,
        loader: authLoader,
        children: [
          {
            path: "profile",
            element: <Profile />,
          }
        ]
      },
      // 404 페이지
      {
        path: "*",
        element: <NotFound />
      }
    ]
  }
],
)

export default function Router() {
  return <RouterProvider
    router={router}
    fallbackElement={<LoadingFallback />}
  />
}
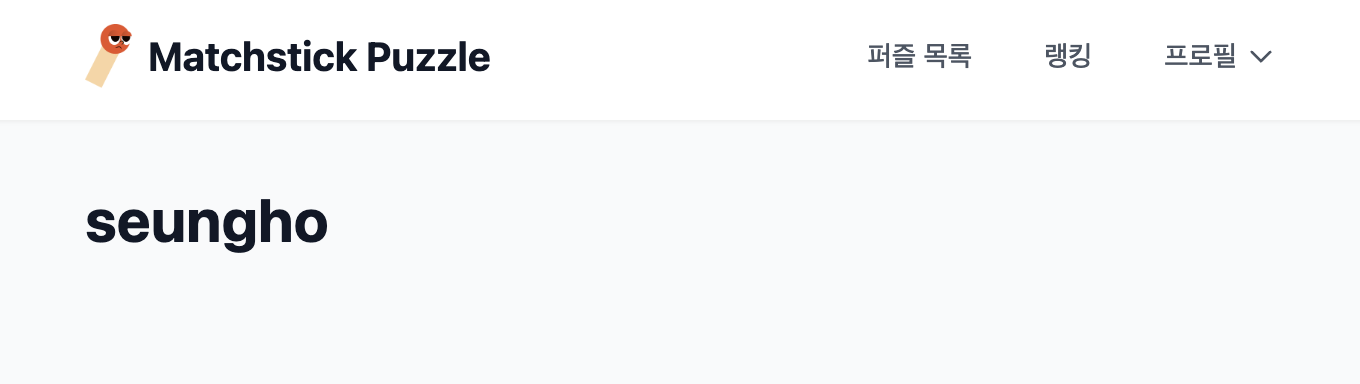
이렇게 로더에서 리턴된 username을 profile 컴포넌트에서 useLoaderData() 훅을 통해 가져와 사용할 수 있다.
import { useEffect, useState } from "react";
import { useLoaderData } from "react-router-dom";

export default function Profile() {
  const loaderData = useLoaderData();
  const [username, setUsername] = useState(null);

  useEffect(() => {
    const username = loaderData?.username
    if (username) {
      setUsername(username);
    }
  }, [loaderData, outletData]);

  return (
    <div className="space-y-8">
      <div className="flex flex-row gap-3 items-center">
        <h1 className="text-3xl font-bold text-gray-900">
          {username || "알 수 없음"}
        </h1>
      </div>
    </div>
  );
}
'개발 > 개발로그' 카테고리의 다른 글
| [Matchstick Puzzle] Github Actions 자동배포 #001 (0) | 2025.02.14 |
|---|---|
| [React] 성냥퍼즐 웹 서비스 만들기 13일차 (nodemailer, bcrypt, JWT) (0) | 2024.12.21 |
| [React] 성냥퍼즐 웹 서비스 만들기 12일차 (ValidationPipe) (0) | 2024.12.19 |
| [React] 성냥퍼즐 웹 서비스 만들기 11일차 (Mysql / Prisma / NestJS) (2) | 2024.12.17 |
| [React] 간단한 성냥퍼즐 웹 서비스 만들기 10일차 (Nest.js) (0) | 2024.12.13 |